
This guide will teach you how to build FrostWire on a Windows computer, assuming you have none of the requirements to build it and you don’t want to spend any money on development tools.
To build FrostWire, you will need the source
1. Download and install the Java SE Development Kit for x86
(our binary dependencies are 32-bit to maximize compatibility and we don’t distribute multiple builds)
2. Download and install IntelliJ CE
4. Open the git console and clone the frostwire repository to your computer:
git clone https://github.com/frostwire/frostwire
Inside the new “frostwire” folder you will have all the necessary code to build both FrostWire Desktop and FrostWire Android.
5. Download and install gradle
This step means downloading a .zip file from the gradle website, and unzipping it on a folder of your preference in your computer. We recommend that you use the “Git Bash” program to do all the work, and that you unzip the gradle folder inside:
/c/Users/yourUserName/bin/
so you will end up with your gradle executable at:
/c/Users/yourUserName/bin/gradle-2.11/bin
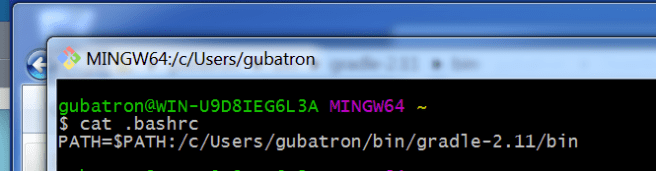
Make sure you will have that path on your $PATH variable. To do this, create a “.bashrc” file inside /c/Users/yourUserName/
My ~/.bashrc looks like this:
6. Set your JAVA_HOME variable.
Now that you have a .bashrc file, let’s add there a JAVA_HOME variable. It must point to the path of your Java Development Kit’s folder (JDK)
On my default JDK installation my JAVA_HOME is
“/c/Program Files (x86)::/Java/jdk1.8.0_74”
Your .bashrc should look like below.

Don’t forget to reload the .bashrc into the environment do so with
source .bashrc
BUILDING FROSTWIRE FOR DESKTOP
Change directories into the “frostwire” cloned code repo, and type
gradle build

now that it’s built, go into the “desktop” folder and execute the run script.
cd desktop
./run.bat

